Plant
This page will guide you through the process of creating a custom plant for AgriCraft.
Before we start, we have to choose a resource location for the plant.
We are creating a tomato plant, so let's use tuto:tomato as the plant's resource location.
This guide is split in two parts:
- Datapack: defines the behaviour of the plant
- Resourcepack: defines how the plant is rendered
Datapack
The data part consists of only one json file defining the plant. Below is the location of the file.
data
 └─tuto  # the namespace of the resource location of your plant ("tuto" here) which is also the id of your datapack
    └─agricraft
       └─plants  # agricraft/plants is the folder used by agricraft to load plants in the game
          └─tomato.json  # The name of the file must match the id of your plant ("tomato" here)
Creating a simple plant
First, let's create a simple plant. Every plant requires the following fields:
mods: list of mods required to load this plant. Currently not usedseeds: list of items that can be used as a seed for this plant. Note that AgriCraft will always generate it's own seed for the plant. More information about adding seeds can be found below.stages: list of growth stages for this plant. Every stage should be a number corresponding to the height of the plant in pixels.harvest_stage: growth stage that the plant will have after it gets harvested.growth_chance: chance the plant has of growing on a random tick.growth_bonus: chance the plant has of growing bonus on a random tick.cloneable: determines if the plant can be cloned.spread_chance: spread chance of the plant on clone.requirement: an object containing plant's requirements:soil_humidity,soil_acidityandsoil_nutrients: humidity, acidity and nutrients of the soil required for the plant to grow. An in-depth explanation is provided below.min_light: minimum light required for the plant to grow.max_light: maximum light required for the plant to grow.light_tolerance_factor: light tolerance of the plant. For each level of plant strength,min_lightdecreases andmax_lightincreases by the given value.
Other than the fields mentioned above, all fields are considered optional.
Here is an example of a simple plant that grows on farmland and has the same growth stages as wheat:
{
  "mods": [],
  "seeds": [],
  "stages": [
    2,
    4,
    6,
    8,
    10,
    12,
    14,
    16
  ],
  "harvest_stage": 4,
  "growth_chance": 0.75,
  "growth_bonus": 0.025,
  "cloneable": true,
  "spread_chance": 0.1,
  "requirement": {
    "soil_acidity": {
      "type": "equal",
      "tolerance_factor": 0.2,
      "value": "slightly_acidic"
    },
    "soil_humidity": {
      "type": "equal",
      "tolerance_factor": 0.15,
      "value": "wet"
    },
    "soil_nutrients": {
      "type": "equal_or_higher",
      "tolerance_factor": 0.1,
      "value": "high"
    },
    "min_light": 10,
    "max_light": 16,
    "light_tolerance_factor": 0.5
  }
}
Adding plant products
Products are stored in two different arrays: products and clip_products. Both arrays function similarly, with the key difference being that clip_products are only dropped when harvesting with a Clipper.
A product object requires the following fields:
item: tag or resource location of the item to be produced.min: minimum amount that can be dropped.max: maximum amount that can be dropped.chance: chance for this product to be produced.required: if set totrue, the product will exist only if the item is present in the game.nbt: the NBT that will be added to the item. [optional]
If multiple drops are present in the array, all of the products will be dropped according to the individual chance.
Here is an example of adding potato drops to the plant:
  "products": [
    {
      "item": "minecraft:potato",
      "min": 1,
      "max": 4,
      "chance": 0.95,
      "required": true
    },
    {
      "item": "minecraft:poisonous_potato",
      "min": 1,
      "max": 2,
      "chance": 0.02,
      "required": true
    }
  ]
Adding seeds
item: tag or resource location of the item that will be used as a seed.override_planting: iftrue, default item behaviour will be overridden to place an AgriCraft plant instead.grass_drop_chance: chance for this seed to drop when grass is broken.seed_drop_chance: chance for this seed to drop when the crop is broken.seed_drop_bonus: chance for a second seed to drop when the crop is broken.nbt: NBT needed for the item to be considered a seed. [optional]
Here's an example of adding potato as a seed for the plant:
  "seeds": [
    {
      "item": "minecraft:potato",
      "override_planting": true,
      "grass_drop_chance": 0.0,
      "seed_drop_chance": 1.0,
      "seed_drop_bonus": 0.0
    }
  ]
Specifying soil humidity, acidity and nutrients
soil_humidity, soil_acidity and soil_nutrients requirements consist of the following fields:
type: can be one of the following:equal: the condition of the soil must be equal to the plant condition. If it is higher or lower, the plant will not grow.equal_or_lower: the condition of the soil must be equal or lower than the plant condition. If it is higher, the plant will not grow.equal_or_hight: the condition of the soil must be equal or higher than the plant condition. If it is lower, the plant will not grow.
value: the value of the requirement. See soil condition values for the possible soil requirements of the plant.tolerance_factor: broadens the requirement based on plant's strength.
How the soil conditions are used
The requirement of the plant is met if the soil value is in the range plant_requirement ± (plant_tolerance * plant_strength).
Example:
Assuming the plant has a strength of 10 and this is its humidity requirement:
{
  "soil_humidity": {
    "condition": "damp",
    "type": "equal",
    "tolerance_factor": 0.2
  }
}
damp has a value of 2 (its index in this chart).
The range of soil humidity for such requirement is 2 ± (0.2 * 10) which is [0, 4].
This means the crop can grow on soils with humidity arid, dry, damp, wet, or watery when its strength is 10.
Note that if the type of the requirement was equal_or_higher the range would have been [0, +inf[
and ]-inf, 4] if it was equal_or_lower.
How to set a specific soil for the plant?
For each soil condition, set the same condition value as the soil in the plan requirement, with equal for the type and 0 for the tolerance factor.
How to allow other soils after a specific plant strength?
You can use this tool to determine the tolerance factor for each soil condition.
Adding additional requirements
All of the requirements mentioned below have to be added to the requirement object you should already have in the plant file.
Biome and dimension
biomes and dimensions fields allow you to specify in which biomes or dimensions your plant will or won't grow.
These requirements use the following fields:
values: a list of biome or dimension resource locations.blacklist: iftrue, the specified biomes or dimensions will be blacklisted (the plant won't grow in them).ignore_from_strength: the requirement will be ignored if the strength of the plant is greater or equal to this value. Defaults to 11 (meaning the requirement will never be ignored). [optional]
Here is an example of a requirement that stops the plant from growing in plains and desert biomes:
  "biomes": {
    "values":  [
      "minecraft:plains",
      "minecraft:desert"
    ],
    "blacklist":  true,
    "ignore_from_strength":  11
  }
Season
If you are using a mod that adds seasons, you can make your plant grow only during specific seasons. To do this, add a seasons field to the requirement. It should be a list of all the seasons during which the plant can grow.
Here is an example of a requirement that makes the plant grow only during spring and autumn:
  "seasons": [
    "spring",
    "autumn"
  ]
Block conditions
block: tag or resource location of the required block below the soil.strength: the requirement will be ignored if the strength of the plant is greater or equal to this value. Setting it to 11 means the condition will never be ignored.states: list of states that must be present in the block. [optional]
Here is an example of a requirement that makes the plant grow only when there is some kind of a diamond ore under the soil:
  "block_conditions":  [
    {
      "block": "#agricraft:ores/diamond",
      "strength": 11
    }
  ]
Fluid condition
Fluid condition can be added with a fluid_condition field. The fluid condition object requires the following fields:
fluid: tag or ID of the fluid.states: list of states that must be present in the fluid. [optional]
  "fluid_condition": {
    "fluid": "minecraft:empty",
    "states": []
  }
Adding modifiers
Modifiers allow you to further customize your plants by adding special effects, such as actions during harvest or effects on collision.
To add a modifier, add a modifiers section to your plant file. It should contain an array of all the modifiers you want to use.
Each modifier should have an id. Additionally, some modifiers require a value to further specify the action. Here you can see an example of summoning a zombie on plant harvest:
  {
    "id": "agricraft:summon",
    "value": "minecraft:zombie"
  }
Since modifiers are stored in an array, you can have multiple modifiers at the same time:
  "modifiers": [
	{
	  "id": "agricraft:brightness"
	},
    {
      "id": "agricraft:summon",
      "value": "minecraft:zombie"
    }
  ]
Available modifiers
agricraft:brightness: crop will emit light.agricraft:burn: crop will burn colliding entities.agricraft:bushy: crop will slow down colliding entities.agricraft:experience: crop will drop experience on harvest.agricraft:fungus: crop will grow a fungus tree when bonemealed at max growth.valuespecifies the resource location of the fungus that will be grown.
agricraft:poisoning: crop will apply the poison effect to colliding entities.agricraft:redstone: crop will emit redstone signal.agricraft:summon: crop will summon an entity on harvest.valuespecifies the resource location of the mob that will be summoned.
agricraft:thorns: crop will hurt colliding entities (like a cactus).agricraft:tree: crop will grow a tree when bonemealed at max growth.valuespecifies the resource location of the sapling that will be grown.
agricraft:withering: crop will apply the wither effect to colliding entities.
Adding particle effects
To make particles spawn around your plant, add a particle_effects section to its file. It should contain an array of all the particle effects that you want to add.
Each particle effect requires the following fields:
probability: chance for the particle to spawn. [range 0.0-1.0]stages: list of plant stages at which the particle can spawn.particle: resource location of the particle that will spawn.delta_x,delta_yanddelta_z: these represent how far from the center of the block the particles will spawn in the given direction.
Here is an example of adding smoke particles to a fully-grown plant:
  "particle_effects": [
    {
      "probability": 0.4,
      "stages": [
        7
      ],
      "particle": "minecraft:smoke",
      "delta_x": 0.3,
      "delta_y": 0.4,
      "delta_z": 0.3
    }
  ]
Resourcepack
The resource part consists of multiple json file defining how the plant will be rendered in the game. This is probably the most work you'll have to do. Below is the location of each file, according to the plant json define above.
assets
 └─tuto
    ├─lang
    │  └─en_us.json
    ├─models
    │  ├─crop
    │  │  ├─tomato_stage0.json
    │  │  ├─tomato_stage1.json
    │  │  ├─tomato_stage2.json
    │  │  ├─tomato_stage3.json
    │  │  ├─tomato_stage4.json
    │  │  ├─tomato_stage5.json
    │  │  ├─tomato_stage6.json
    │  │  └─tomato_stage7.json
    │  └─seed
    │     └─tomato.json
    └─textures  // the textures files are optionals, they depends on whatever textures you used in the models
       ├─plant
       │  ├─tomato_stage0.png
       │  ├─tomato_stage1.png
       │  ├─tomato_stage2.png
       │  ├─tomato_stage3.png
       │  ├─tomato_stage4.png
       │  ├─tomato_stage5.png
       │  ├─tomato_stage6.png
       │  └─tomato_stage7.png
       └─seed
          └─tomato.png
Crop Models
AgriCraft will try to load a model for the plant block to its resource location and its growth stage.
It will load the plant models in <namespace>/models/crop/<id>_stage<stage>.json where the namespace and id correspond
to the namespace and the id of the plant (tuto and tomato in our example) and stage correspond to the growth stage of the plant.
This means you have to define one model per growth stage you defined in your plant json.
You can use whatever model you want for your plant, but AgriCraft provides multiple default models for ease of use and are described as follows:
crop_hash: 4 faces parallel with the block faces, similar to Vanilla wheat.
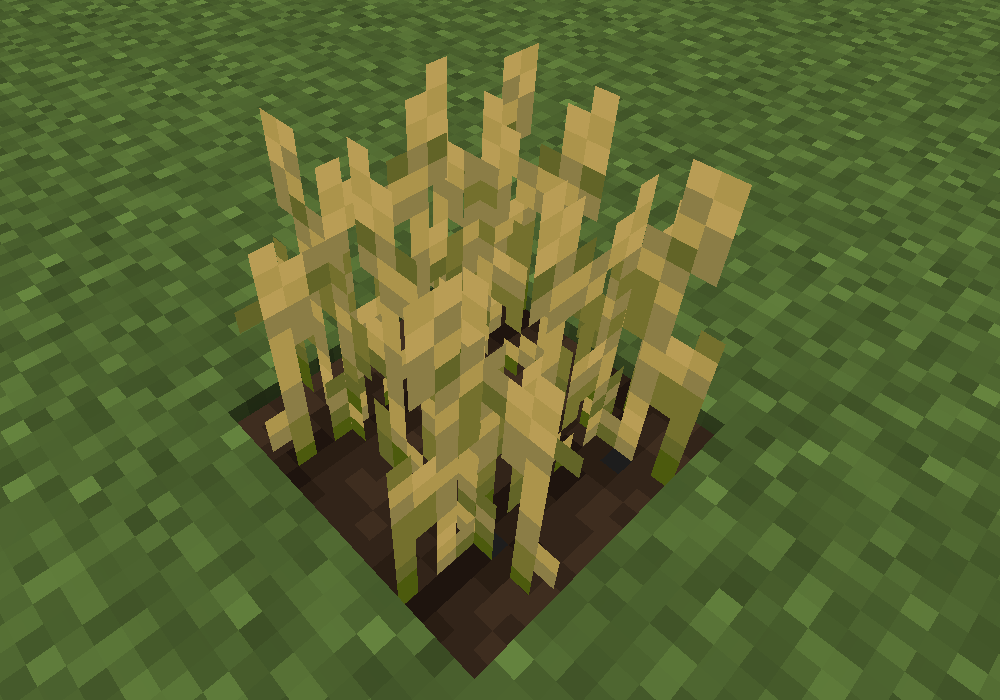
{
  "parent": "agricraft:crop/crop_hash",
  "textures": {
    "crop": "<your_crop_texture_here>"
  }
}
tall_crop_hash: likecrop_hashbut 2 blocks high
{
  "parent": "agricraft:crop/tall_crop_hash",
  "textures": {
    "crop": "<your_crop_texture_here>",
    "crop_top": "<your_crop_top_texture_here>"
  }
}
crop_cross: 2 faces along the diagonals, similar to Vanilla flowers.
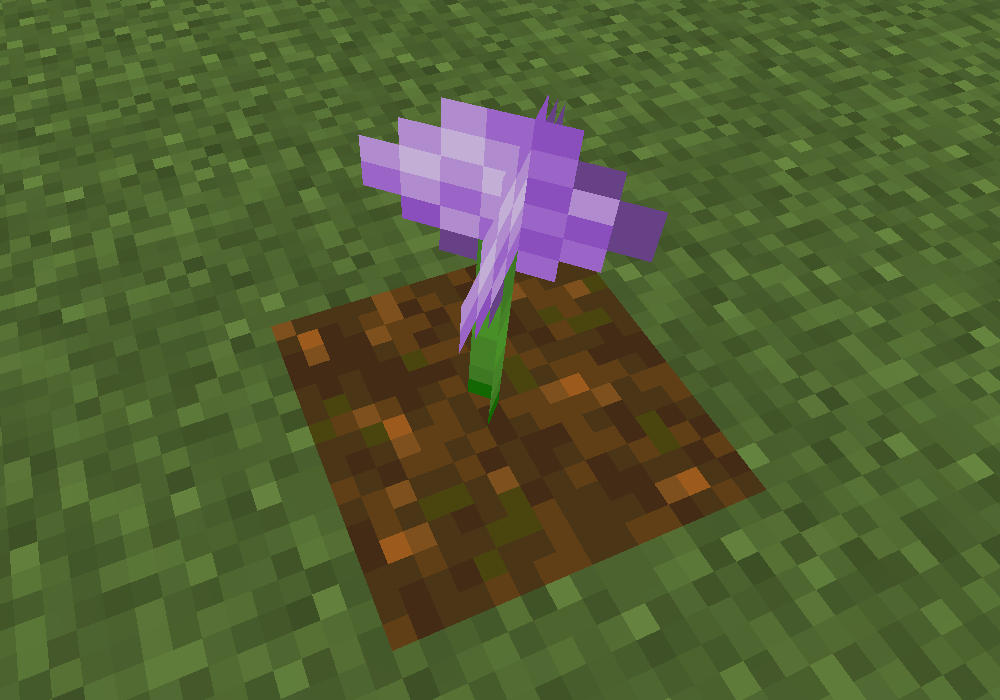
{
  "parent": "agricraft:crop/crop_cross",
  "textures": {
    "crop": "<your_crop_texture_here>"
  }
}
crop_plus: Similar to cross, but instead 4 crosses at each crop stick.
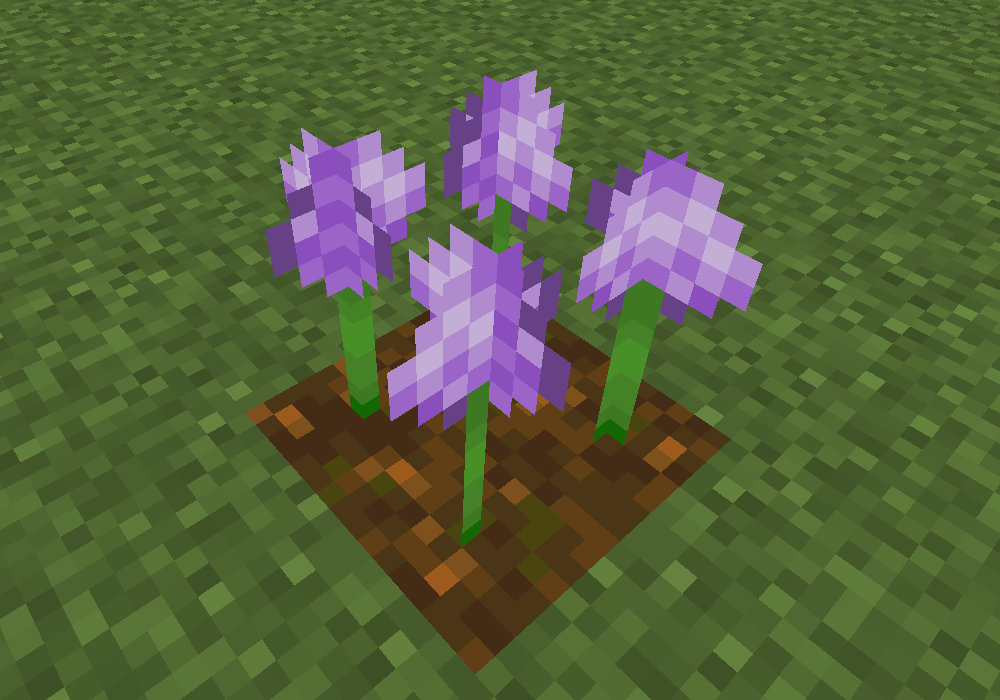
{
  "parent": "agricraft:crop/crop_plus",
  "textures": {
    "crop": "<your_crop_texture_here>"
  }
}
tall_crop_plus: likecrop_plusbut 2 blocks high
{
  "parent": "agricraft:crop/tall_crop_plus",
  "textures": {
    "crop": "<your_crop_texture_here>",
    "crop_top": "<your_crop_top_texture_here>"
  }
}
crop_gourd: i.e. for pumpkins and melons: renders a hash pattern with thecroptexture, and a small gourd with thegourdtexture.
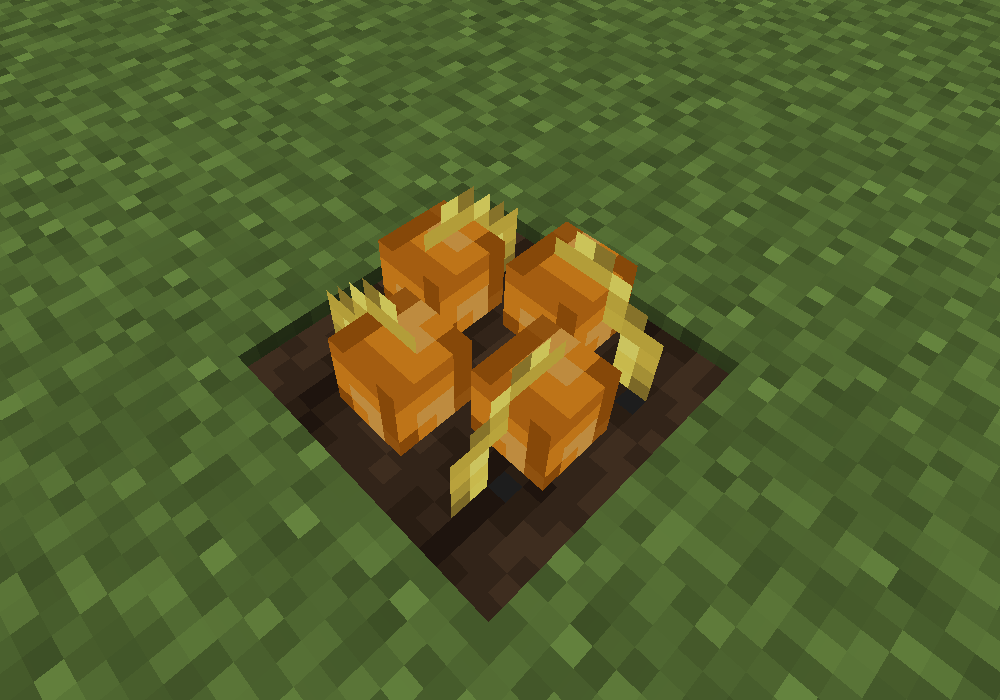
{
  "parent": "agricraft:crop/crop_gourd",
  "textures": {
    "crop": "<your_crop_texture_here>",
    "gourd": "<your_gourd_texture_here>"
  }
}
crop_rhombus: 4 faces spanning between the centers of the block faces, mainly used for weeds.
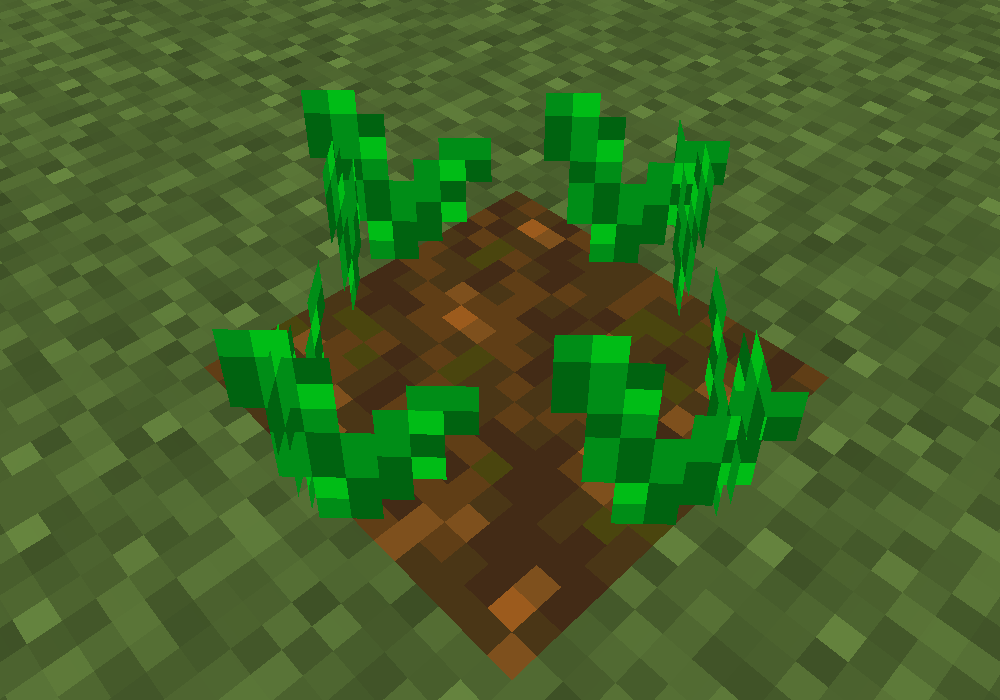
{
  "parent": "agricraft:crop/crop_rhombus",
  "textures": {
    "crop": "<your_crop_texture_here>"
  }
}
Seed models
AgriCraft will try to load the model for the default plant seed from the path <namespace>/models/seed/<id>.json.
Textures
AgriCraft will also load textures from textures/plant/ and textures/seed/ too, so you can put your plant and seed textures there if you want.
Translation
AgriCraft will localize the name of the plant, its seed and its description according to the following keys:
plant.agricraft.<namespace>.<id>: the name of the plantseed.agricraft.<namespace>.<id>: the name of the seeddescription.agricraft.<namespace>.<id>: the description of the plant